Creating a Feature from Scratch
This guide will outline the process of creating a new feature from the beginning.
If you haven’t already, please read the Config Development Introduction & Creating A Pack From Scratch for more information before continuing.
For a more detailed and in-depth guide about creating a new feature from scratch, please read this unofficial development guide, Feature Config.
Setting up a New Feature
PROCEDURE
1. Add feature stage(s)
Feature generation is divided up into generation stages. Your pack will need to define at least one generation stage in order to generate any features.
Open your pack manifest in your editor of choice.
Add the generation-stage-feature addon as a dependency, using versions 1.+.
This addon will allow us to create new generation stages for features within the pack manifest.
1id: YOUR_PACK_ID
2
3version: 0.1.0
4
5addons:
6  language-yaml: "1.+"
7  chunk-generator-noise-3d: "1.+"
8  ...
9  generation-stage-feature: "1.+"
Add the highlighted lines below to your pack manifest to create these generation stages.
 1id: YOUR_PACK_ID
 2
 3...
 4
 5stages:
 6  - id: trees
 7    type: FEATURE
 8
 9  - id: landforms
10    type: FEATURE
We’ll only be using the trees stage for this guide.
Tip
The generation stage ids can be named to your liking and generation stages will generate in order from top to bottom.
2. Create your structure file
Structure files can
either be dynamic TerraScript .tesf or static schematic .schem files.
TerraScript files are written in the TerraScript Language. TerraScript allows for procedurally generated structures and unique complex structure layouts.
Add the
structure-terrascript-loaderaddon to the pack manifest, using versions1.+Create a blank
.tesffile.Add TerraScript within the
.tesffile to generate the structure.
oak_tree.tesf will be the example file name used for this guide.
A sample oak_tree.tesf file has been provided below if you need it.
 1num height = 5+randomInt(3);
 2
 3num randPrecision = 100;
 4num radius = 2.5+randomInt(randPrecision)/randPrecision*2;
 5num warp = 1;
 6num warpFreq = 1;
 7num squish = 1.5+randomInt(randPrecision)/randPrecision;
 8num radiusSquared = pow(radius,2);
 9
10for (num h = 0; h < height; h = h + 1) block(0,h,0,"minecraft:oak_log");
11
12for (num x = -radius-warp; x < radius+warp; x = x + 1) {
13    for (num y = (-radius-warp)/squish; y < (radius+warp)/squish; y = y + 1) {
14        for (num z = -radius-warp; z < radius+warp; z = z + 1) {
15            num warpX = warp * sampler("simplex3",
16                                warpFreq*(x+originX()),
17                                warpFreq*(y+originY()+1000),
18                                warpFreq*(z+originZ()));
19            num warpY = warp * sampler("simplex3",
20                                warpFreq*(x+originX()),
21                                warpFreq*(y+originY()+2000),
22                                warpFreq*(z+originZ()));
23            num warpZ = warp * sampler("simplex3",
24                                warpFreq*(x+originX()),
25                                warpFreq*(y+originY()+3000),
26                                warpFreq*(z+originZ()));
27            if (pow(x+warpX,2)+pow((y+warpY)*squish,2)+pow(z+warpZ,2) < radiusSquared) {
28                block(x, y+height, z,"minecraft:oak_leaves", false);
29            }
30        }
31    }
32}
Schematic files consist of an arrangement of blocks that make up a structure that can be saved through WorldEdit.
Add the
structure-sponge-loaderaddon to the pack manifest, using versions1.+Source a
.schemfile, these can be created using WorldEdit if you wish to create your own.Add the
.schemfile to your pack.
oak_tree.schem will be the example file name used for this guide.
3. Create your feature config
Add the config-feature addon to the pack manifest, using versions 1.+.
This addon will allow us to create feature config files.
1id: YOUR_PACK_ID
2
3version: 0.1.0
4
5addons:
6  ...
7  config-feature: "1.+"
Create a blank config file and open it your editor.
Set the config type via the type
parameter, and config id as shown below.
oak_trees.yml will be example file name used for the feature config in this guide.
1id: OAK_TREES
2type: FEATURE
4. Add the feature distributor
Distributors determine the x-axis and z-axis placement of a feature in the world.
Add the config-distributors addon to the pack manifest, using versions 1.+.
This addon provides a set of distributors to use within feature config files.
1id: YOUR_PACK_ID
2
3version: 0.1.0
4
5addons:
6  ...
7  config-distributors: "1.+"
Configure the oak_trees.yml config to utilize the PADDED_GRID distributor type as shown below.
1id: OAK_TREES
2type: FEATURE
3
4distributor:
5  type: PADDED_GRID
6  width: 12
7  padding: 4
8  salt: 5864
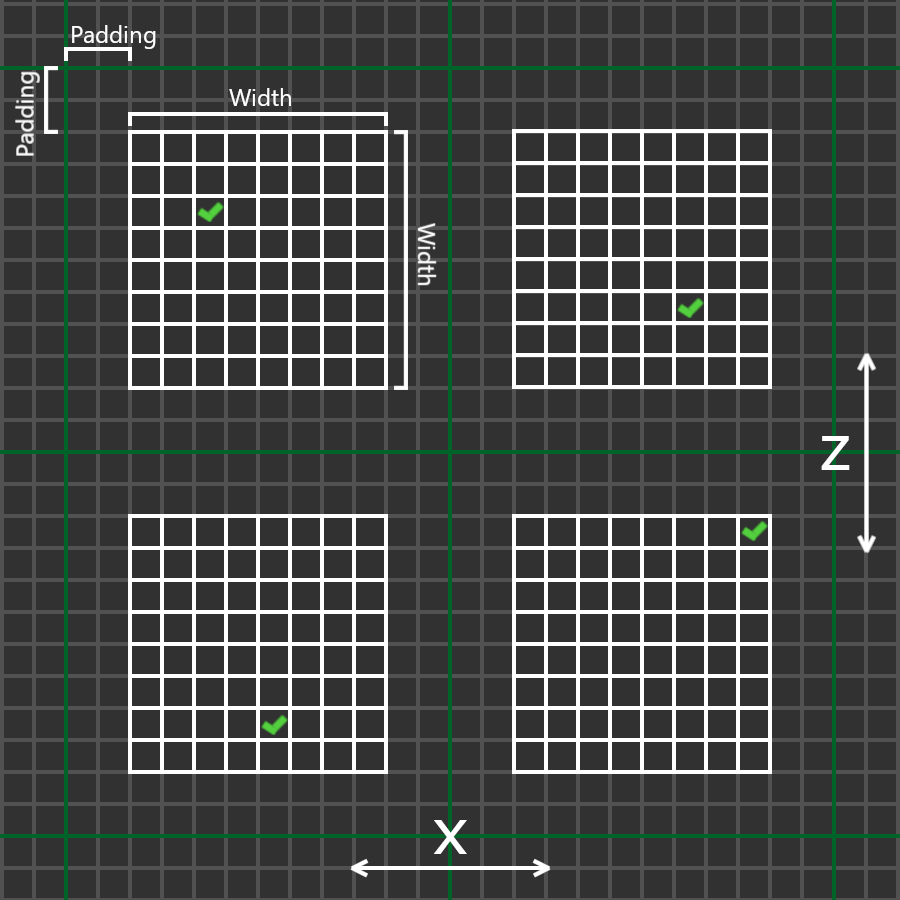
The PADDED_GRID distributor type utilizes cells in a grid with
the feature placed within each cell with padding between each cell
to ensure that features don’t generate too close to one another.
PADDED_GRID utilizes the nested parameters width, padding, and salt.
Width- Determines the size of each cell that will contain your featurePadding- Determines the gap between each cellSalt- Typically a random number that offsets the distributor results to prevent feature placement overlap with the same distributor type. Salt function covered in detail here.
Note
Documentation of PADDED_GRID and other distributor types can be found here.
5. Add the feature locator
Locators determine the y-axis placement of a feature in the world.
Add the config-locators addon to the pack manifest, using versions 1.+.
This addon provides a set of locators to use within feature config files.
1id: YOUR_PACK_ID
2
3version: 0.1.0
4
5addons:
6  ...
7  config-locators: "1.+"
Configure the oak_trees.yml config to utilize the TOP locator type as shown below.
 1id: OAK_TREES
 2type: FEATURE
 3
 4distributor:
 5  ...
 6
 7locator:
 8  type: TOP
 9  range:
10    min: 0
11    max: 319
The TOP locator type will place the feature on the block located at the highest y-level.
Note
Documentation of the various locator types available can be found here.
Tip
You can utilize multiple locators for stricter criteria as shown below with the AND locator.
 1locator:
 2  type: AND
 3  locators:
 4    - type: TOP
 5      range: &range  #range values anchored for other locators to use
 6        min: 0
 7        max: 319
 8    - type: PATTERN
 9      range: *range  #references previously anchored range values
10      pattern:
11        type: MATCH_SET
12        blocks:
13          - minecraft:grass_block
14          - minecraft:dirt
15        offset: -1
6. Add the structure
You can now add your structure to the oak_trees.yml config with the highlighted lines below.
 1id: OAK_TREES
 2type: FEATURE
 3
 4distributor:
 5  ...
 6
 7locator:
 8  ...
 9
10structures:
11  distribution:
12    type: CONSTANT
13  structures: oak_tree
The structures parent key consists of the nested parameters
structures.structures and structures.distribution.
structures.structures determines the structure or weighted list
of structures to select from upon feature generation in the world.
structures.distribution determines the noise sampler
that influences the structure selection results.
Tip
Features can select from a weighted list of structures with a noise sampler to guide the structure selection as shown below.
1structures:
2  distribution:
3    type: WHITE_NOISE
4    salt: 4357
5  structures:
6    - oak_tree_1: 1
7    - oak_tree_2: 1
8    - oak_tree_3: 1
Weighted lists covered in detail here.
7. Apply features to biomes
Open a biome file with your editor.
We’ll use FIRST_BIOME from
Creating A Pack From Scratch for this guide
Add the highlighted lines below to the FIRST_BIOME config.
 1id: FIRST_BIOME
 2
 3type: BIOME
 4
 5vanilla: minecraft:plains
 6
 7terrain:
 8  sampler:
 9    type: LINEAR_HEIGHTMAP
10    base: 64
11
12palette:
13  - BLOCK:minecraft:stone: 319
14
15features:
16  trees:
17    - OAK_TREES
The OAK_TREES feature should now generate your oak tree structures in FIRST_BIOME.
Tip
Multiple generation stages in biome configs will be done as shown below:
 1id: FIRST_BIOME
 2
 3type: BIOME
 4
 5...
 6
 7features:
 8  trees:
 9    - OAK_TREES
10  landforms:
11    - ROCKS
8. Load your pack
At this stage, your pack should now be capable of generating oak trees! You can load up your pack by starting your
development client / server which contains the pack you have just defined. You can confirm that your pack has loaded
if the pack id (as specified in the pack manifest) appears when using the /packs command, or in your console
when starting the server / client up.
If for whatever reason your pack does not load, an error message will show up in console explaining why the pack has failed to load, please read through any of these errors and try to interpret what you may have done wrong, and follow through the previous steps again carefully.
If you still are unable to load the pack, feel free to contact us with any relevant errors.
Conclusion
Once you have verified your pack has loaded correctly, you can now generate a world with your new oak trees!